.Planning (Assignment) Board v1.8.0
Overview
The Planning (Assignment) Board provides all required Functions to check, create and edit Assignments of Resources to Projects with different planning Approaches. The Board covers the number of Calender Weeks determined by the Plugin Configuration & Permissions beginning with the selected Calendar Week. It shows the Assignment Duration (Working Hours) per Calender Week (horizontal axis) either for 1. Projects > 2. Resources, 1. Resources > 2. Projects or Resources only (vertical axis) selected by the current Project & Resource Filter .
Projects > Resources View
(Click to enlarge) | 1: List of available Project & Resource Filters which can be used for the Assignment Board only. 2: Create new Project & Resource Filters which can be used for the Assignment Board only. 3: Navigate to the required View (see above / below). 4: Invoke Popup to edit currently selected Project & Resource Filter. 5: Invoke Popup to create new Assignment for a single Resource for arbitrary Timeframes. 6: Actual Board which shows / allows to edit the Assignment for each Project / Resource / Calendar Week. 7: Toggle between Plan and Analytics view for the selected filter. 8: Scroll through Calendar Weeks or select one to control the Starting Date of the Board. 9: Export selected Filter Content (projects and ressources) to MS Excel. |
Resources > Projects View
(Click to enlarge) | Difference to Projects > Resources View: 1: Actual Board which shows / allows to edit the Assignment for each Resource / Project / Calendar Week. |
Resources (only) View
(Click to enlarge) | Difference to Projects > Resources View: 1: Actual Board which shows, but does NOT allow to edit the Assignment for each Resource / Calendar Week. |
Create Assignment (Popup)
To create completely new, create additional or change existing Assignments for a Project and Resource you can use the Support of the Create Capacity Popup:
(Click to enlarge) | 1: Select the Distribution Algorithm to be applied (- see below: Distribution Algorithms). 2: Select the Project you want to create an Assignment for (- see below: Visibility). 3: Select the Resource you want to create an Assignment for (- see below: Visibility). 4: Select the respective Timeframe. 5: Enter the Duration of the Assignment to be distributed (- according to the selected Algorithm). 6: Dynamic Information depending on the defined Context (Resource, Timeframe) to support Assignment Planning (- see below: Dynamic Parameters). 7: Decide whether you want to add the selected Project and / or Resource to the active Resource Filter to show it immediately. 8: Create another assignment: Popup remains opened after save and context remains selected as well. This could be used to create similar assignments for multiple resources. |
Distribution Algorithms
Currently there are two Distribution Algorithms available:
| Algorithm | Description |
|---|---|
| Fixed Duration per Week | Assign the same, entered Duration for each Week of the selected Timeframe to the selected Context (Project, Resource) - useful: for statistical Planning (e.g. Maintenance, SLAs).
|
| Distribute value in period | Distribute the entered Duration according to 1. Net Availability, 2. Gross Availability, 3. Capacity, 4. Default Capacity for the respective Context (Project, Resource). Example: Distribute 80 hours in a timeframe of 4 weeks > Algorithm will distribute the 80 hours according to availability in this timeframe.
|
Dynamic Parameters
All Parameters described below are dynamically caclulated relating to the selected Timeframe and the selected Resource:
| Parameter | Description |
|---|---|
| Availability | Working Hours available = Capacity - Absence - Assignments of same Resource in other Projects. |
| Capacity | (Basic) Capacity in Working Hours. |
| Calendar Weeks | Number of Calendar Weeks covered by the selected Timeframe. |
| Calendar Weeks with Availability | Subset of Calender Weeks for which there is an Availability > 0. |
| Calendar Weeks with Capacity | Subset of Calender Weeks for which there is an Capacity > 0. |
| Days with Availability | Subset of Days for which there is an Availability > 0. |
| Days with Capacity | Subset of Days for which there is an Capacity > 0. |
Delete Assignment
(Click to enlarge) | 1: Assignments can be deleted by using the pulldown directly located at each assignment header. |
Access and Visibility
The accessibility of the Assignment Board can be configured fur users and groups in Plugin Configuration & Permissions.
For creation of assignments only JIRA users assigned to projects will be visible.
For filtering of assignments only projects / resources for assignments already created will be shown.
Portfolio for Jira integration
If you use Portfolio for Jira, you can use the Portfolio for Jira extension for AIM's Resource Management App to plan a team on the assignment board and transfer it as a SharedTeam to Portfolio.
To transfer a team to Portfolio, you have to do the following steps:
- Open the Label Board from the Resources menu (top navigation bar)
- Click on the 'Team Labels' tab on the Label Board
- Enter a new Team label and click the 'Add' button
- Open the Assignment Board from the Resources menu (top navigation bar)
- Click on the 'New project filter' entry in the right sidebar
- On the 'Select Projects' tab, select the newly created Team label and add it to the list of selected projects
- Enter a filtername at the bottom of the dialog
- Click on the 'Save' button in the filter creation dialog
- Add one or more resources via the 'Create assignment' button
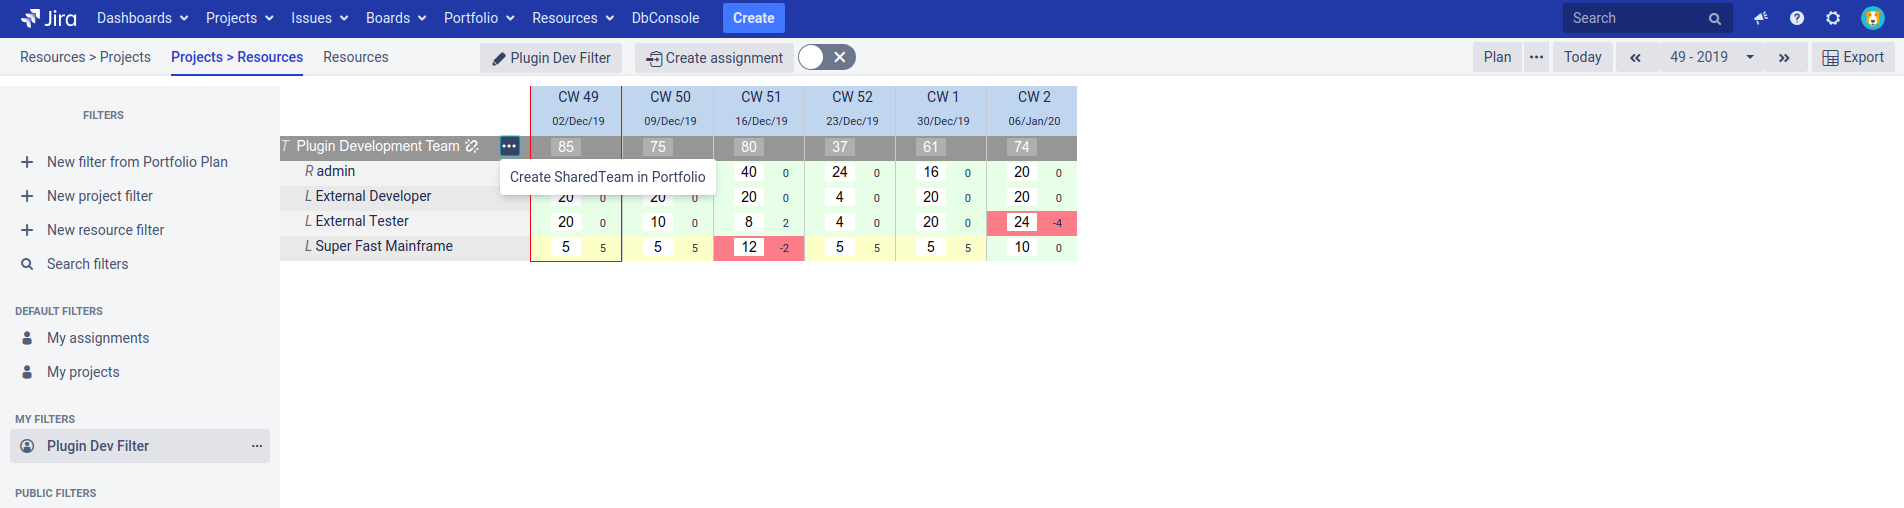
- Hover with your mouse cursor over the team name in the assignment table and an menu button should appear
- Click on the menu button to open the team action menu
- Click on the 'Create SharedTeam in Portfolio' menu entry
Now you have create a new SharedTeam in Portfolio for Jira. As you may have notice, the icon next to the team name has changed. This icon indicates the current coupling status between the Team label and the Porfolio SharedTeam.

If you add new resources to a coupled team, these resources will be added to the SharedTeam in Portfolio. Any changes to the assignment values will also be changed in the SharedTeam resource assignment values. If you remove a resource from the team, the resource will also be removed from the SharedTeam.
If you want to uncouple the team from the Portfolio SharedTeam, open the team action menu again and click on the 'Uncouple Portfolio SharedTeam' menu entry.
Please notice, that the synchronization of a team only works in one direction. If you add, change or remove a resource on the assignment board, these changes will be synchronized to the SharedTeam in Portfolio. But if you add, change or delete a resource in the SharedTeam in Portfolio, these changes will not be synchronized to the team on the assignment board.
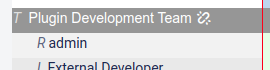
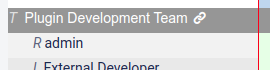
The Resource Management team can be in one of the following states:
| State | Icon | Description |
|---|---|---|
| Uncoupled |
| The team is not coupled to a Portfolio SharedTeam |
| Coupled |
| The team is coupled to a Portfolio SharedTeam |
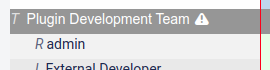
| Coupled with deleted SharedTeam |
| A Portfolio SharedTeam was created from this team, but the SharedTeam has been deleted in Portfolio |
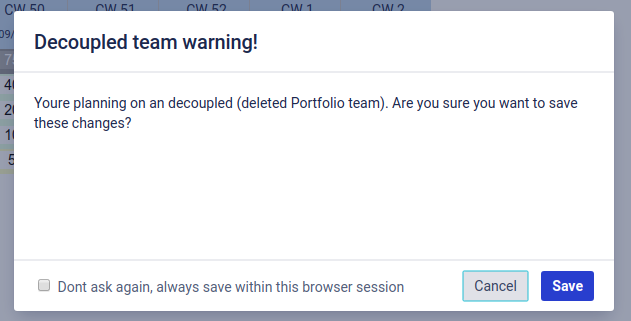
Decoupled team warning
If you change the assignment values of a coupled team that has been deleted in Portfolio, an decoupled team warning dialog appears, that informs you about the fact, that the SharedTeam has been deleted.